Moving on, Friday, July 6th was Shane's, my boyfriend's, birthday and instead of buying him something, I decided to make him something. His mom wanted to have a party for him with friends and family so I decided to make myself useful and, yet again, make something.
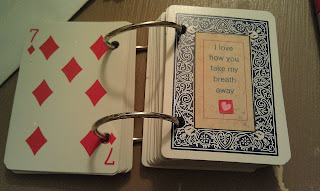
My attempt with his birthday present was a little thing I found on Pinterest called "52 Things I Love About You" (click here for original). It was super cute and even though there were barely any instructions, I made it my own. I also took the time to create a tutorial for you guys as well just in case you like it and would like to know how I did it.
Materials needed: Ruler, Deck of playing cards, Paper (white, colored, or decorative letterhead), Scissors, Rubber Cement, One Hole Punch, Permanent Marker, Microsoft Word, and Metal Rings (rings were found in Wal-Mart's Office Supply section or Michael's Embroidery section).
Optional accessories I used: Heart Stickers & Assorted Printed Card stock (all from Michael's).
- Get out your paper you will be using to print the "labels" on. I picked decorative letterhead paper because I wanted that old antique look but you can use any of the paper suggestions I listed above. Load them into the printer and open your deck of cards. On the colored side, take a ruler and measure where your paper will be placed. Mine measures 5.5cm by 3cm (2.25"x1.25").
- Open Microsoft Word and insert a rectangle shape. Adjust the image to the correct size you need it. If you're using white paper and you want the shape colored, then pick your color. If you're using decorative paper then just select a border color. Copy and then paste the shape onto one page. I fit about 12 rectangles on to one page but it depends on the size you measured. Make sure they're the correct size you need before moving on! You will need 54 boxes. Yes, 54, we are using the Jokers.
- If you plan on writing inside the rectangles with your own handwriting, skip this step and go to Step 4. If you want to use the fonts on Word then unfortunately, you have to make more rectangles so keep copying and pasting until you get enough shapes. Once you have all your shapes, make sure they're still the correct size because mine ended up becoming bigger than the original size I wanted. If that happens to you too, go through them all and re-size them. Here comes the long part. Insert a text box into each rectangle but make sure you pick the option to DRAW the text box. You can either do one at a time (draw text box then write what your want) or what I did was inserted a text box into every rectangle and then went back through to write what I wanted. The choice is yours.
- The first box should say "52 Things I Love About You" and the last box should say "Love Always, ______________" (insert your name). Once you do those two, go ahead and fill in all your boxes with inside jokes, quotes, or stuff you actually love about that person (i.e. You don't mind washing dishes, because you put up with me when I am grumpy, etc).
- Once you have one page done, figure out how many pages you'll need to cover the cards and print them. Always make sure to preview before you print to check for mistakes!!
- Now that the longer part is done and out of the way, it's time to finish the project. Take all your little rectangles and cut them out. Make sure to organize them according to the order you want them in to make the next step easier. Once all your rectangles are cut, you can proceed to glue them onto the colored side of the card. You can either use Rubber Cement or Mod Podge to do so, I picked rubber cement because it dries quick and it much cheaper. Also make sure that the rectangles that say "52 things" and "love always" are on the Jokers so you don't mess up the rest of the deck.
- You can decorate the front using the stickers you have, I put anywhere from 1-4 heart stickers on the corner of the paper to give it a little decorative edge.
- Then, you can use your card stock to cover the numbers by gluing the card to it. You can probably fit as little as 3 on a piece depending on the size of your card stock. Then cut AROUND the card (be sure not to directly cut the card). Then organize them back into the order you want to attach them.
- Once your deck is complete, use an extra card from the deck (in my case, I had one card left to do this with) and punch out two holes. This is where the rings will attach to. In order to get the holes in the same spot every time, use the sample card to do so. Line it up with the card you're punching and use the marker to mark the exact spot then punch them out. I found it easier to mark every two cards so when you punch them, you punch two at a time.
- Once you punched them all out, go ahead and attach your rings.
Congratulations! You just completed your "52 Things I Love About You" project!


Instead of me creating a "Part 2" to describe what I made for his party, I figured I'd split it using a pretty page divider.
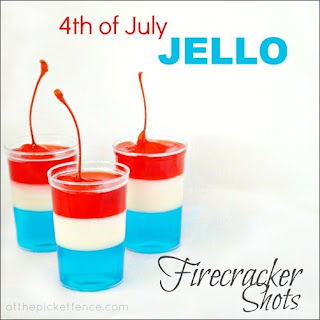
I wanted to make something that screamed "Red, White, & Blue" since that was another theme for his party. While on Pinterest, I found this recipe for Jell-O Firecrackers. I thought the original version would be bland and dull (do those words mean the same thing??) so I decided I wanted to add alcohol to them. Low and Behold, at the bottom of the recipe, there was an alcohol version! And off I went to Party City to buy the shot glasses!
These were a big hit and everybody LOVED them! My parents (as diabetic as they are) had TWO each and Shane's Mama (grandma) even tried one too!


No comments:
Post a Comment